Author Archives: Kelley

My Newest Addiction

Standard

runners highA few months back, life seems to have put me on a path of getting healthy.  So I started dieting by counting my calories and running five days a week and one of those days I get the privilege of attending boot-camp with some amazing ladies.  During the next few months I found my newest addiction.  While they are sleeping, I get up, have my quite time (cause I can’t start the day without hearing from the Lord), drink some coffee (cause let’s face it, no one is “normal” without some java) and then go run.   It’s a routine that I’ve become accustomed to and quite honestly, have become addicted to.  I would be lying if I told you I was only running for my health.

Did you know that not only is running a great way to get your body into shape, it can also change your mood, prevent disease, boost your confidence,relieve stress, eliminate depression and completely turn your world upside down in the most positive ways!  I’ll give you a list of website that give you good information to help convince you running is the best way to lose weight and feel great PLUS foods to eat after your run to help keep your body working even after you’re finished.  Don’t take my word for it it…get out there and try it for yourself.  Go…get addicted.  I promise you’ll be happy you did!

Benefits of Running
http://www.active.com/health/articles/6-benefits-of-running
http://www.fitbie.com/get-fitter/5-brain-benefits-running
http://www.runnersworld.com/health/6-ways-running-improves-your-health?page=single

Best foods to Eat After
10. Oatmeal – Oatmeal is a great post-run food because it contains carbohydrates, protein and fiber. Fiber makes you feel full so you don’t risk over-indulging.
9.  Greek Yogurt
8. Hummus – It’s full of protein and it also contains plenty of fiber to help make you feel full.
7. Chicken – Duh.
6. Salmon – Contain’s omega-3 fatty acids and antioxidants that’ll help your body recover.
5. Sports Bars – Also referred to as an energy bar, workout bar or any number of other names.
4. Banana’s – A great source of protein.
3. Fruit – Any fruit will work because they’ll make you feel full and full of fiber.
2. Almonds – They provide antioxidants and, if eaten regularly, can even lower cholesterol.
1. Veggies – Antioxidants, protein, carbohydrates, vitamins and minerals.

My Running List – promise to not laugh
1. This is how we do – Katy Perry
2. Shake it Off – Taylor Swift
3. Only Girl (in the world) – Rihanna
4. Love Runs Out – OneRepublic
5. Timber – Pitbull, Keisha
6. Lights – Elli  Goulding
7. Your Love is My Drug – Ke$ha
8. Burn – Elli Goulding
9. On the Floor – Jennifer Lopez
10. All About the Bass – Meghan Trainor
11. 4 Minutes – Justin Timberlake and Madonna
12. Drunk on Love – Rihanna
13. Blow – Ke$ha

*this gets me though a 5K

Halloween Decor – DIY

Standard

header-bannerI tried to hold out for hubby to get the decorations down from the attic but just couldn’t wait any longer!  I’ve been waiting three weeks to put up my decorations and started thinking…I really don’t want to use the kiddie decorations I’ve been using the last 10 years.  While there are some cute things in there, I really wanted to update my stash.  So here are a few DIY decorations you can do and they will take you about 30 minutes each!

Burlap Halloween Bannerhalloween bannerI’m a sucker for burlap,  so it was easy to decide what my theme was going to be.  So with that.  Let’s start with the burlap Halloween banner.  It’s about 60 inches wide and will work with almost any size mantle.  Each flag is 5.75 inches wide (9 flags total).  I cut out all the flags and then printed this for the letters.  Here comes the easy part.  Just place the letter behind the flag and trace with a sharpie!  Done.

Spooky Wooden Blocks
spooky blocks
So rather than re-post a whole new how-to on this little cutie…I will just shoot you the link.  I added in some of my own extra letters though to spell our our family name and some other cute words.  That’s where your creative brain kicks in.  You can find the toot here.  Have fun with it!

Spooky Bats
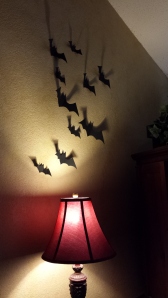
wall batsThis was, I think the coolest decoration and one of my most favorites!  I found a PDF on Pinterest and picked out the best looking bat.  I then made this file spooky bat template and printed it out on white card-stock.  I then cut them out, traced them on black card-stock, cut them out, used a ruler to fold the wings in the middle and taped them up on the wall.  I put them on the fireplace too for a cool effect.
fireplace batsSpooky Toilet Monster
toilet monsterOkay y’all.  This one was my first decoration and the kids LOVED, LOVED, LOVED it!  So easy.  I measured the area I wanted to use, used black card-stock, used a ruler to get the angle right, made some fingers like so, cut out two white eyes and then added some black for the middle of the eyes.  I taped on the monster and let my kids find the creature on their own.  Wish I had recorded their reaction.  It was cute.

Creepy Spider Burlap Banner
spider runner
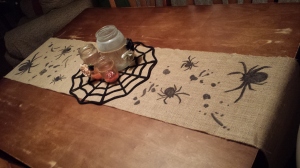
Last but not least.  The creepy spider burlap banner.  I found a cool picture on pinterest (yeah, I know) of a spider.  I recreated it in Illustrator and made three sizes.  I saved a PDF just for you spooky spiders.  My table top is 48 inches long so I just designed it to be on the table top, not the ends.  So I printed out the template and placed it under the burlap.  I used a black sharpie to trace the shadows of the spiders.  I then added “paint” splotches around the banner.  I got the cool web from Dollar Tree to put in the middle.  Cool huh!

That’s all I have for now.  Be looking out for cool toot on how to make a cool wooden “Happy Halloween” sign to put as a cool center piece, up on the mantle or in your entry way.  Have a happy Wednesday!

DIY Burlap Runner – Fruits of the Spirit

Standard

3-20140612_154807

Yeah, it’s been a long time coming and I PROMISE I have more for you.  Just give me a few weeks to get back in to the groove.  We started homeschooling this past summer and then went full swing the new school year.  It’s been fun and exciting but I have no time to do anything extra.  I mean it.  So the stuff I’m posting are old crafts but new for you.  So here we go!

I measured my table.  Added 12 inches on either side and figured out how wide I wanted my runner.  Then I printed out different sizes for each “fruit of the spirit” with different fonts.  I took a sharpie, placed it under the runner, traced it and bam!  You have a new and perfect, store looking table runner that YOU created.  Took me about 30 minutes to create.  Have fun with it y’all!

DIY Burlap Cross – Doorhanger

Standard

delete

I LOVE crafting.  It fills my “joy/in a good mood” tank!  Every time I get to do a craft (uninterrupted), I get giddy and my heart starts to race.  I started this craft a week ago and my sisters house and just finished it today.  There are loads of cool things you can do on the internet with burlap.  I found this design on Pinterest but she used a wood cross of sorts.  It was not burlap AND she charged way too much for me to just go buy it.  So my crafty self came up with this design.

You’ll need:
2 yards of burlap
acrylic paints and brushes
hot glue gun
15-20 plastic Walmart type bags
pen/pencil
butcher paper

1. So, come up with the design and draw it on some butcher paper.  Make it pretty big (like you are going to actually sew around the cross).  This step took me three tries to get it the exact size I wanted.  2. When you have your design figured out, use a pen to trace the design onto the burlap. 3. Paint the cross with whatever design you want.  I used the chevron design (because it’s popular right now).  You’ll need to let it dry before you move on.  I let it dry over night (or for 3/4 hours).  4. Cut out the painted part of the cross.  Leave the other yard for later.  5. Then hot glue (*USING GENEROUS AMOUNTS OF GLUE) the part of the cross up to where it “t’s”.  Stuff the cross with plastic bags, using a pencil or ruler to get it “stiff”.  Parts of your burlap might come unglued…so glue those parts back.  6. Continue gluing the edges of the cross to get the rest of the cross “stiff” with the plastic bags.  7. Now, cut a strip of burlap to make a bow.  Hot glue that in desired location.  8.  Finally, use a spare piece of burlap to hot glue to the back so that you can hang it on a door hanger.

Voila!  You’re finished!!!  Go craft something cool.  Shoot me a picture, so I can see.  🙂

DIY Fabric Wreath

Standard

fabric wreath

I realize it’s been a while since the last post.  Having two children (one who has stopped napping all-together and the other usually sleeps an hour) makes it hard for me to craft during a no-more-nap-time schedule for me.  I find the only time I have to do anything crafty is at night and by then, I’m tired!  As I said before, it’s been a while since I’ve posted anything.  100% of that reason is we added a new bundle to our blessed family!  He’s three months old and we are SO BLESSED!  He just recently started sleeping through the night so I FINALLY have a little more time.  So with that…this is the craft I’m going to show you.  As I said before, I don’t have a lot of time these days.  The wreath above is the one I made for the hospital door.  Then I brought it home to put on my son’s door.  It took me a total of one hour to do and I got SO many compliments on it.  I apologize for not having any pictures of how to do it.  It’s so easy, anyone can do it.  I promise.  Here’s what you’ll need.

Straw Wreath – get it at Walmart
*don’t take of the plastic and buy the smallest of the two they carry

3 – 4 1/4 yards of coordinating fabric
*I would get four if you’re not good at improvising

floral picks
*usually down the same isle you find the wreaths

ribbon to match your fabric

letter stickers

Okay so cut all your fabric about 1 1/2 inch thick at 12 inches or so long.  Tie each of the four pieces of fabric to your floral pick and pin into your straw wreath.  Do that all the way around your wreath until you’ve covered your wreath completely.  Then take some ribbon and place at the bottom of the wreath to put the baby’s name on.  I got scrap-booking sticker letters for mine.  They stick on hard-core so be careful you won’t need to adjust later.

There’s only a couple tricky things you need to know.  First off, don’t pin your picks so close together or you’ll need more fabric.  I actually had to adjust my picks several times before it looked just right.  Also, the sides of your wreath won’t be completely covered.  If you want a more fluffy wreath than mine, buy more fabric and put your picks closer together.  I’d suggest taking your ribbon, create a hook and hang your wreath up before you pin a whole lot so that you can see how the fabric will fall.  Also, be prepared for lots of frayed material bits all over your floor and clothes.  🙂  Have fun with it!  Post pictures of your creations.  I’d love to see them.  Oh and I will be creating another one soon with actual pictures if you want to wait for that post.  Happy October ya’ll!